
MINI R56 LCI 2010-2013 Manual Accelerator Pedal 35426794502 6PV010435-10


MINI R56 LCI 2010-2013 Manual Accelerator Pedal 35426794502 6PV010435-10
MANUAL ACCELERATOR PEDAL MODULE
Stamped Format: 3542-6794502
Supplier / Engineering Reference: 6PV010435-10
Additional Stamped Reference: 12037313DE
A floor-mounted electronic accelerator pedal/module for compatible MINI R56 LCI 3-door manual applications. This assembly contains the pedal mechanism and integrated pedal-position electronics used to communicate the driver's accelerator demand to the vehicle's engine management system.
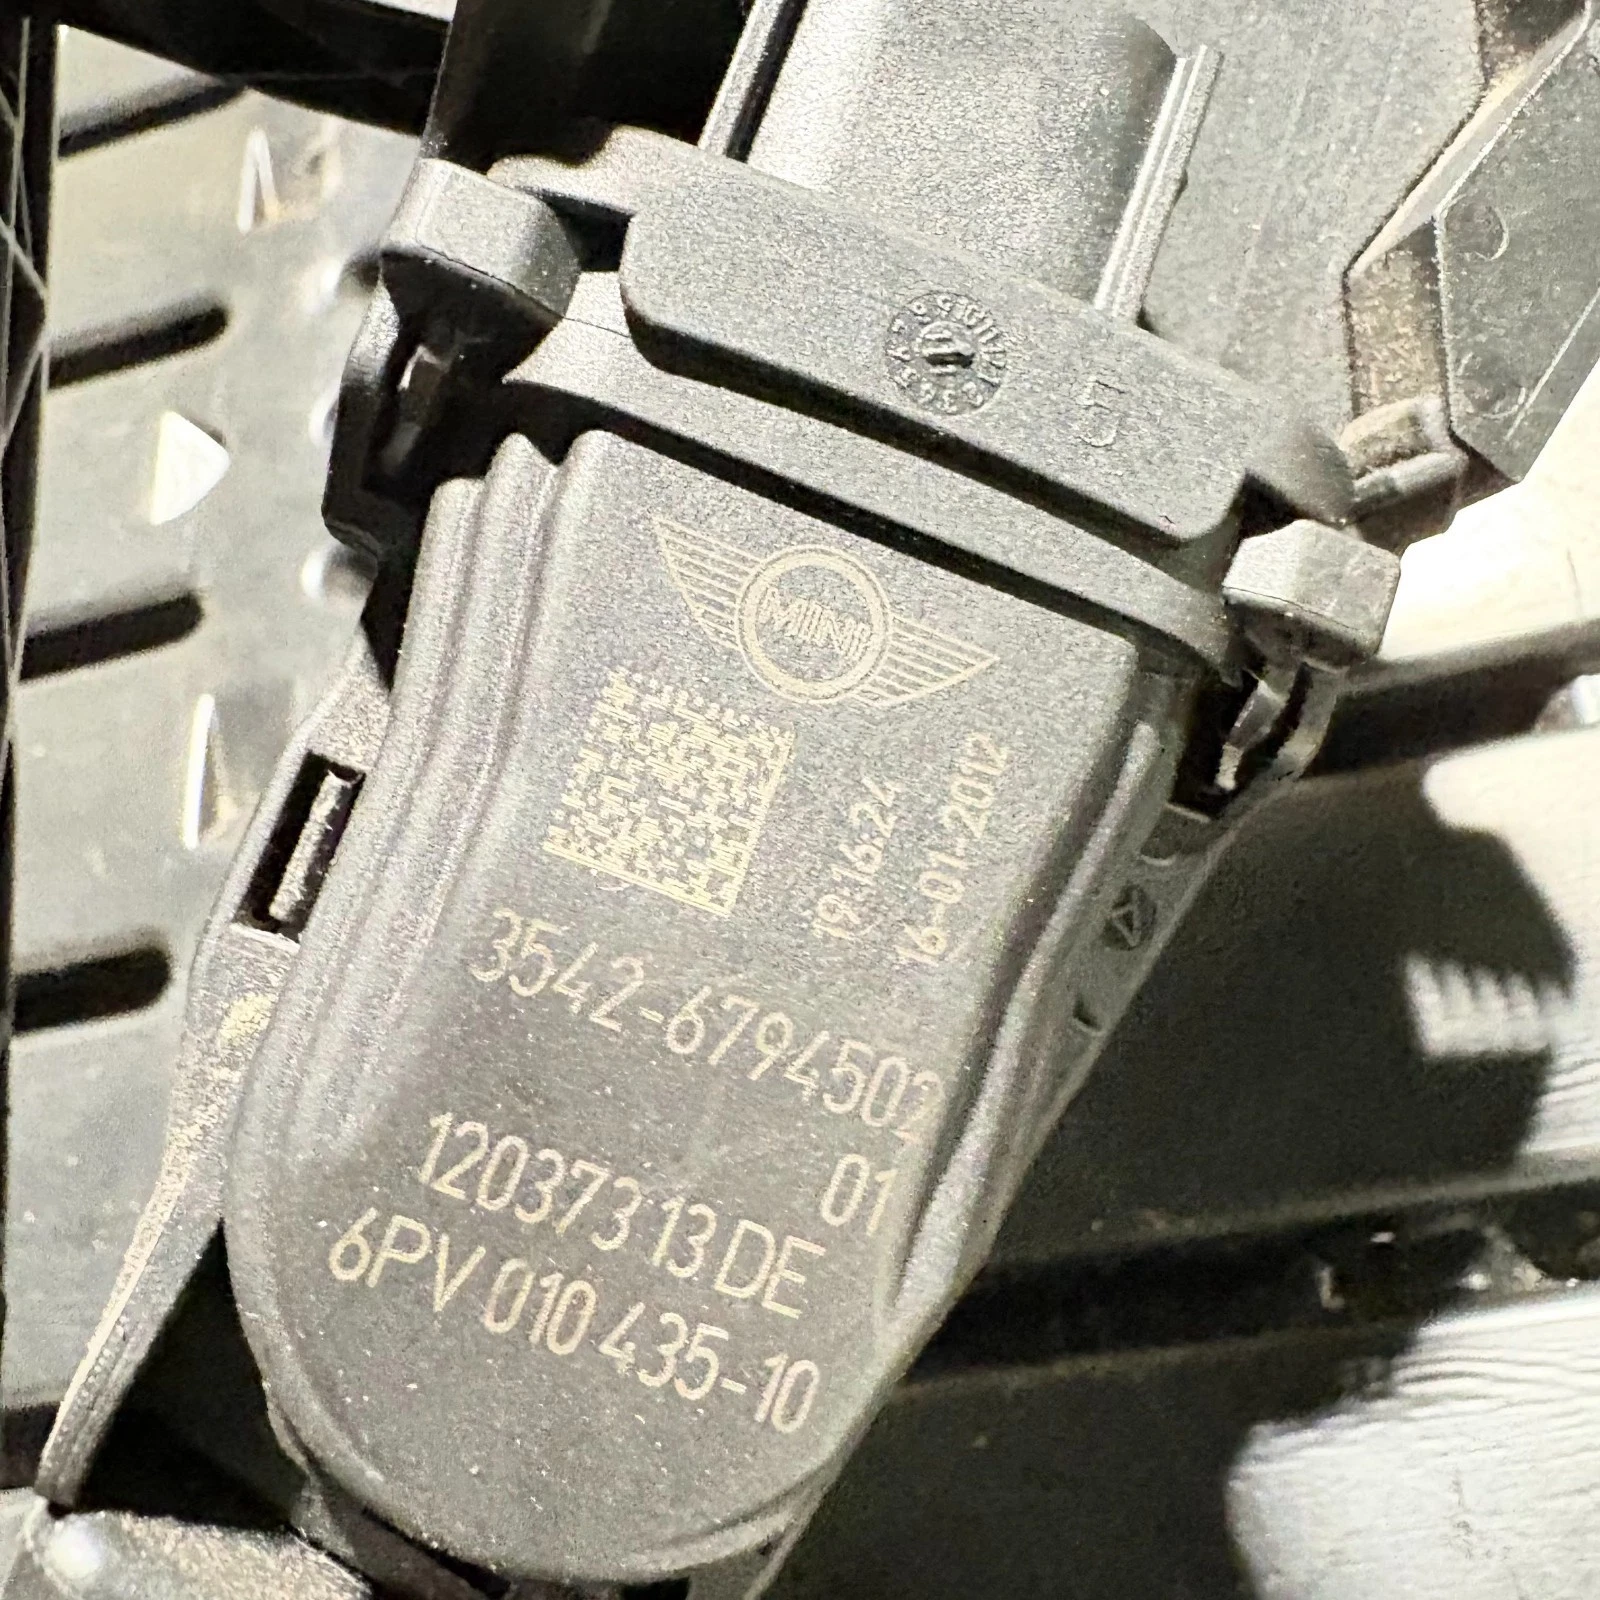
The physical unit pictured is marked 3542-6794502 / 35426794502 and 6PV 010435-10. Please match these numbers against your existing pedal or confirm compatibility using your VIN before ordering.

| Year | Vehicle | Chassis | Body | Transmission | Fitment Requirement |
|---|---|---|---|---|---|
| 2010 | MINI Hatch | R56 LCI | 3 Door | Manual | Exact number / VIN match required |
| 2011 | MINI Hatch | R56 LCI | 3 Door | Manual | Exact number / VIN match required |
| 2012 | MINI Hatch | R56 LCI | 3 Door | Manual | Exact number / VIN match required |
| 2013 | MINI Hatch | R56 LCI | 3 Door | Manual | Exact number / VIN match required |
Compatibility is intentionally number-led. Model year alone is not sufficient to identify an electronic pedal module.
- Do not order solely because your vehicle is a MINI R56 or falls within the same registration years.
- Do not assume an automatic-transmission pedal is identical to this manual-application reference.
- Do not assume other MINI chassis or body styles use the same module simply because the pedal housing looks similar.
- If your original pedal is marked 6PV010435-31 rather than 6PV010435-10, obtain a proper VIN/catalogue cross-reference before purchasing.
- Do not rely exclusively on automated vehicle compatibility dropdowns. Physical numbers, connector configuration, mounting geometry and VIN data should all agree.
The accelerator pedal module converts pedal movement into an electrical driver-demand signal. The engine control system uses this information when commanding engine load and throttle response.
Reusing the correct factory-produced component gives buyers the benefit of the original vehicle engineering: established mounting geometry, connector design, pedal travel, structural stiffness and sensor architecture originally developed around the vehicle platform.

THEPARTPILOT carries more than 25,000 automotive components in stock, helping customers source hard-to-find mechanical, electrical, interior and body components without automatically resorting to brand-new replacement prices.
Trim tool or small suitable flat trim tool • correct hex/Allen-type driver for the existing fastener • ratchet/bit driver • inspection lamp • optional diagnostic scan tool.
This is a planning estimate rather than a factory labour-time quotation. Vehicle condition, diagnostics and damaged/seized hardware can increase repair time.
- Switch the ignition fully off, remove the key/remote from the working area and allow the vehicle electronics to power down.
- Remove the driver's floor mat and any trim obstructing access to the accelerator pedal mounting point.
- Before removal, photograph the original pedal label, electrical connector and mounting arrangement for comparison.
- Remove the pedal mounting cap/cover if fitted and identify the correct retaining fastener or release arrangement.
- Release the existing pedal module using the correct tool and carefully lift/slide it clear of its floor mounting.
- Release the electrical connector by its locking mechanism. Never pull directly on the wiring.
- Compare the replacement and original units side by side: stamped numbers, connector, housing, pedal shape and mounting geometry must agree or be confirmed by the vehicle catalogue.
- Connect and correctly seat the replacement module, then refit its original retaining hardware using the current MINI repair specification applicable to the VIN.
- Confirm unrestricted pedal movement before operating the vehicle.
- Start the vehicle, check accelerator response and warning lamps, and perform fault-code diagnostics if any warning remains.
Based on the approximate 0.5-hour fitting allowance:
| Estimated Time | £40 / hr | £60 / hr | £80 / hr | £100 / hr |
|---|---|---|---|---|
| 0.5 hour | £20 | £30 | £40 | £50 |
Illustrative labour calculation only. Garage minimum charges, diagnostics, additional dismantling or damaged fixings may increase the final workshop bill.

Correct diagnosis matters with electronic accelerator systems. If your original fault involves warning lamps, intermittent accelerator response, wiring damage or limp-mode symptoms, professional diagnostic testing is strongly recommended rather than replacing parts by guesswork.

Components are prepared for transport with secure protective packaging appropriate to their size and construction. Always inspect the parcel and component promptly after delivery.
Where this eligible used component is sold under the applicable Global Accounting VAT Margin Scheme, VAT is accounted for within the margin and is not shown separately on the sales invoice. Accordingly, there is no separately stated VAT amount available for the buyer to reclaim.
Change-of-mind and incorrectly ordered variant returns are handled under the return settings displayed on the eBay order. The returned component should be complete and returned in the same condition in which it was supplied.
Where eBay policy permits and a returned component has been installed, altered, damaged, returned incomplete or otherwise suffered an actual loss in value beyond what was reasonably necessary to inspect it, an eligible deduction may be applied to reflect that demonstrated loss in value, up to the maximum permitted by eBay policy. No automatic restocking deduction is applied simply because a buyer selected the wrong variant.
For product, fitment, fitting-service or order questions, please message our team through eBay Messages.
Our registered business contact details and physical address are displayed by eBay within the Business Seller Information / Business Details section.
WhatsApp QR for Fitment Help / Appointment Enquiries
Scan the QR code to contact ThePartPilot on WhatsApp for fitment checks, appointments or fitting service availability.For faster fitment help, send your vehicle registration, VIN if available, and clear photos of your existing part, connector and part number.