
Hyundai Lantra J1 1994-1995 Front Left Wing Passenger Side NSF Blue Saloon


Hyundai Lantra J1 1994-1995 Front Left Wing Passenger Side NSF Blue Saloon
Hyundai Lantra J1 1994-1995 Front Left Wing
UK passenger side / nearside front (NSF), blue painted pressed-steel panel, for the facelift Hyundai Lantra I / Elantra I J1 four-door saloon.
Actual Part — What You Will Receive
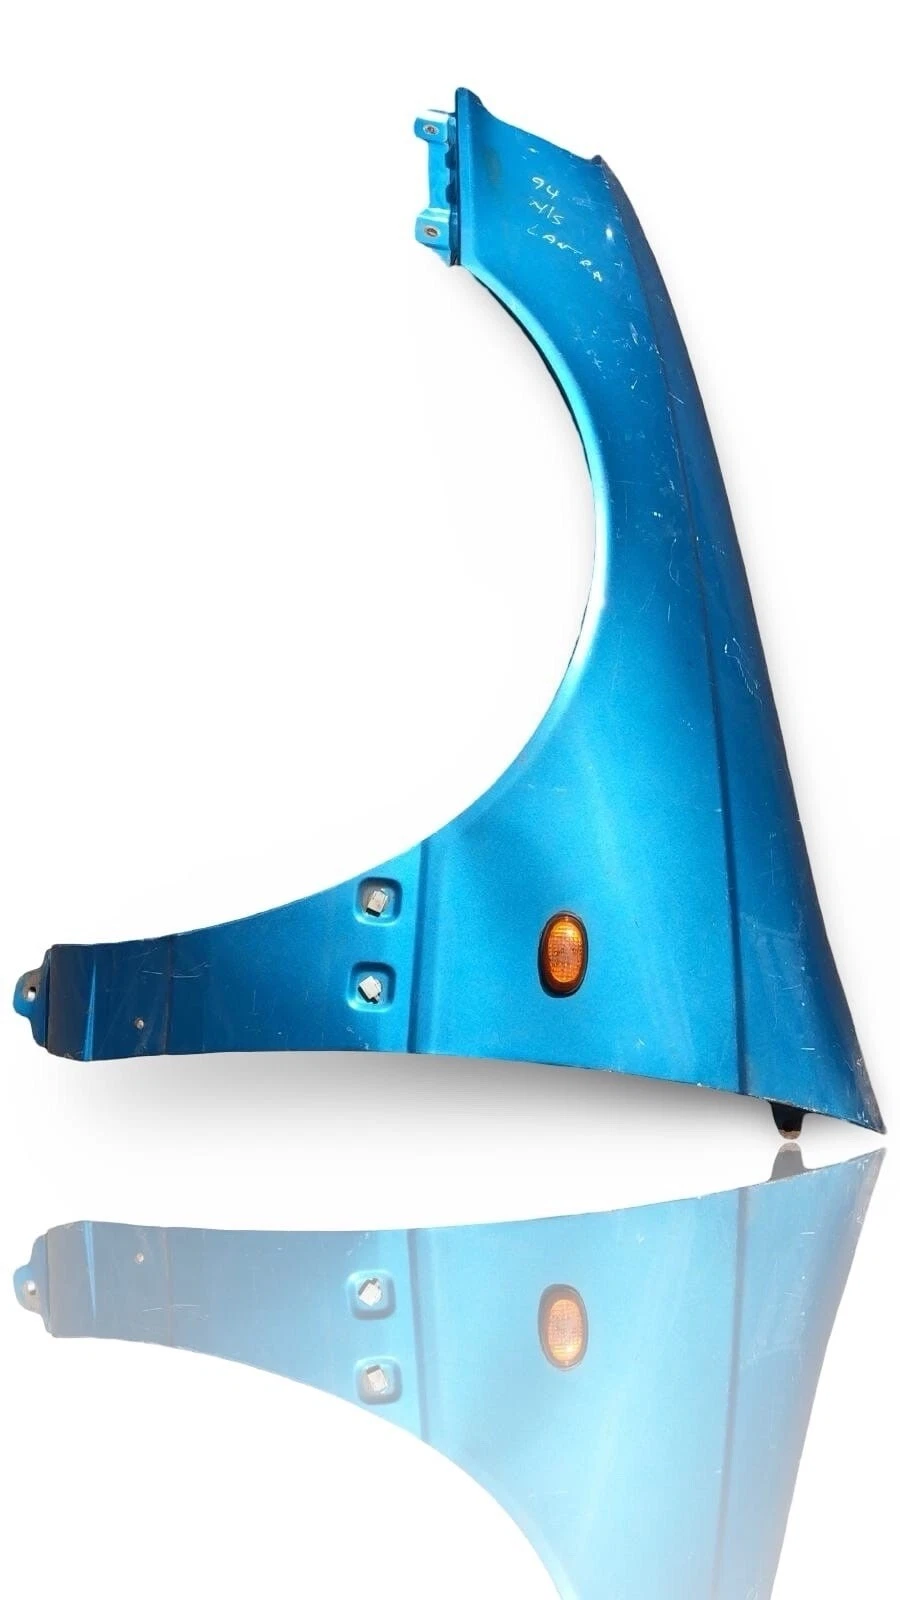

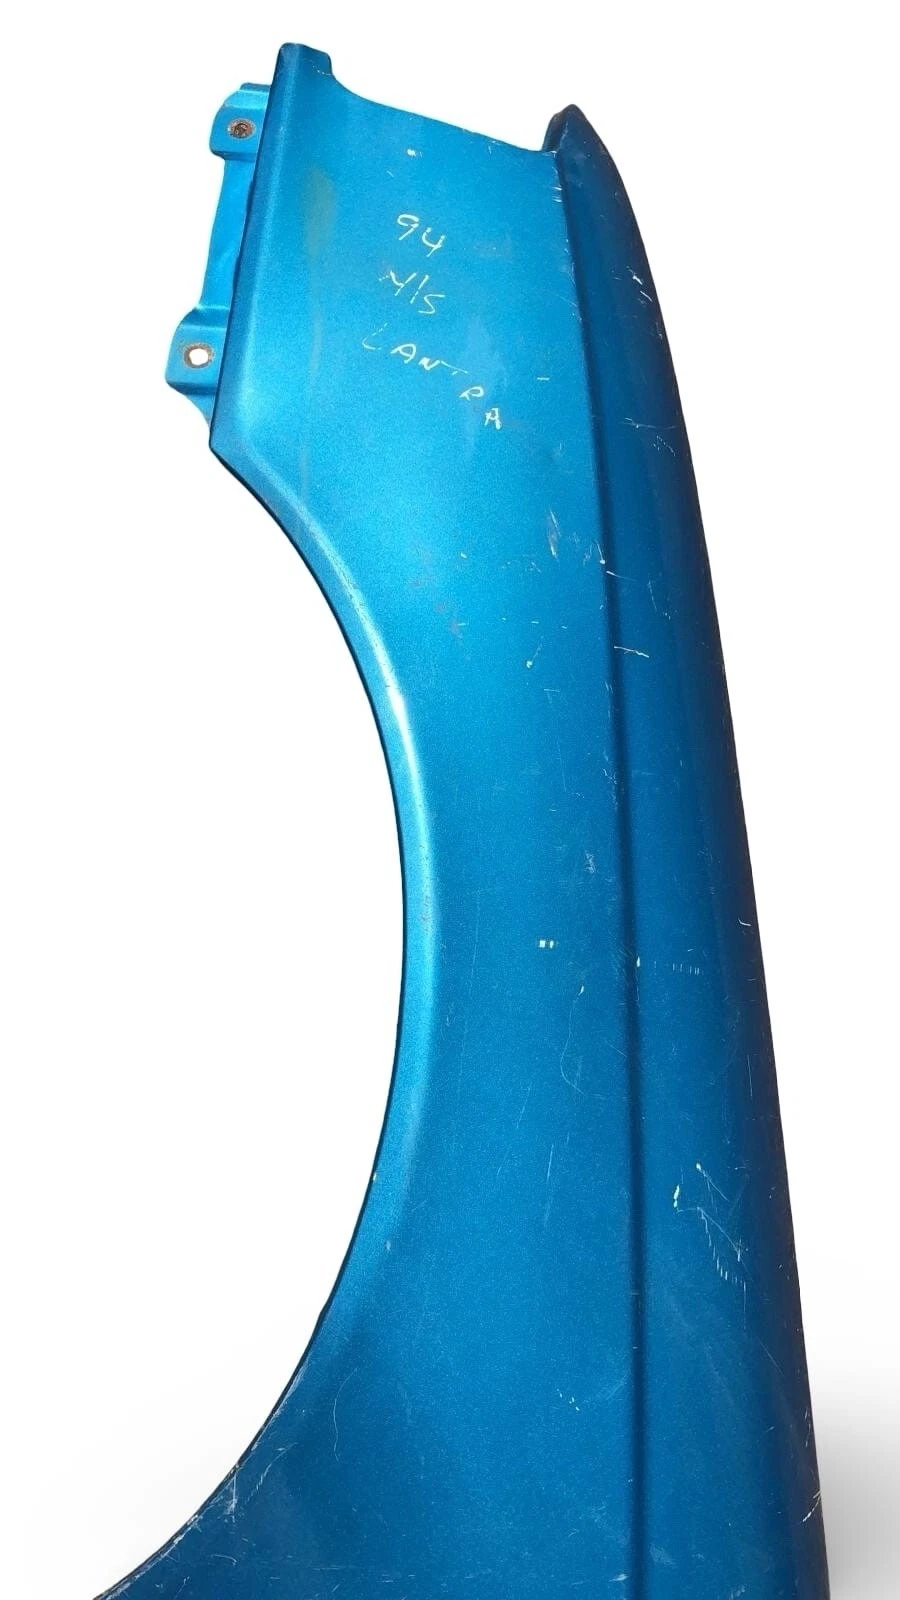
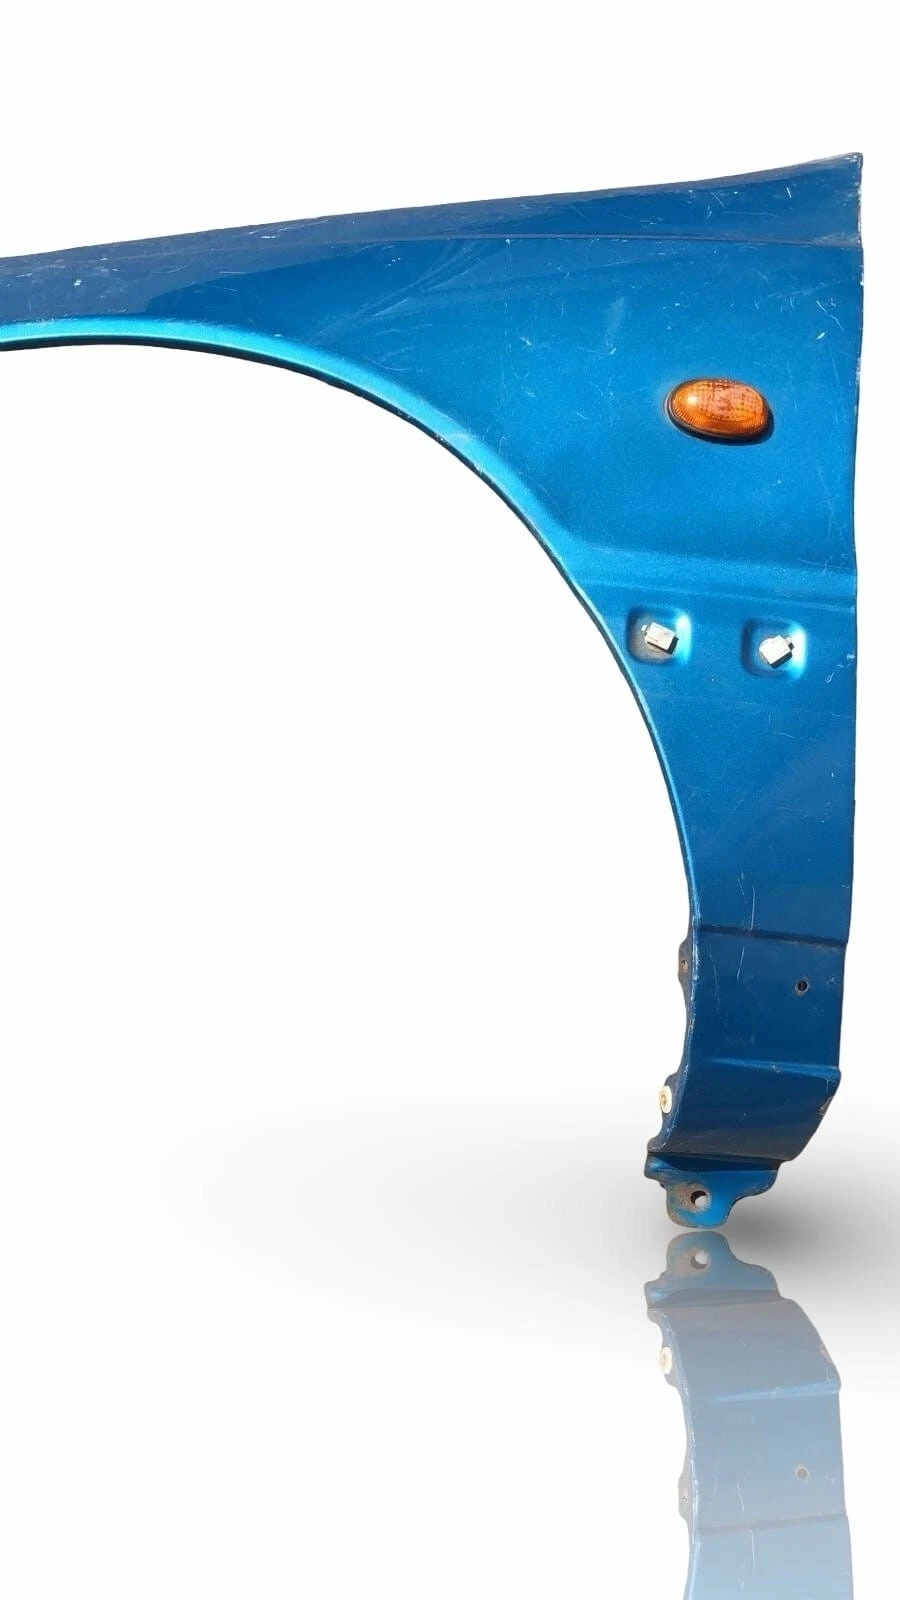
Exact Compatibility Guide
| Vehicle | Years | Body / Generation | Fitment Status |
|---|---|---|---|
| Hyundai Lantra I | 1994-1995 | J1 facelift, 4-door saloon | CONFIRMED APPLICATION — photo/VIN match still required |
| Hyundai Elantra I | 1994-1995 | J1 facelift, 4-door saloon; non-UK market name | SAME J1 BODY APPLICATION where panel details match |
| J1 petrol variants | 1994-1995 | 1.5 / 1.6 / 1.8 where fitted to the same facelift saloon shell | ENGINE SIZE DOES NOT CONFIRM THE WING — match body and apertures |
Why the check matters: body panels can differ by production date, sales market, indicator arrangement and trim specification even when the model name looks the same.
Vehicles This Part Is Not Listed To Fit
| Vehicle / Version | Status | Reason |
|---|---|---|
| Hyundai Lantra / Elantra J1 pre-facelift | 1990-1993 — NOT CONFIRMED | Do not purchase unless every contour, aperture and fixing point matches the photos. |
| Hyundai Lantra / Elantra II J2 | 1995/1996-2000 — DOES NOT FIT | Different second-generation front bodywork, lamps, bonnet and wing design. |
| Lantra J2 estate / wagon | DOES NOT FIT | Different generation and front panel design. |
| Elantra XD and later generations | 2000 onward — DOES NOT FIT | Completely different body shell and mounting geometry. |
| Right front / UK driver side wing | DOES NOT FIT | This is the left-hand wing: UK passenger side / nearside front. |
| Wing without side-repeater opening or with different moulding holes | DOES NOT FIT | The photographed aperture and trim-hole arrangement must be present on your vehicle. |
Reference Vehicle & Fitting Position

VIEWER'S RIGHT

Reference vehicle photographs are public-domain Wikimedia Commons images and are not photographs of the donor vehicle or the item supplied.
Part Numbers & Cross-Reference Information
| Reference Type | Number | Important Note |
|---|---|---|
| Likely manufacturer catalogue reference | 66311-28170 | Commonly associated with the 1993-1995/J1 left front wing and visually consistent with the photographed side-repeater configuration. |
| Catalogue cross-reference | 66311-28270 | Frequently catalogued for 1994-1995; some catalogues describe a no-indicator-hole variation. Treat as a cross-reference only and match the actual panel shown. |
| Aftermarket search reference — not the supplied brand | PRASCO HN0253004 | Useful only as a shape/application lookup reference. |
| Aftermarket search reference — not the supplied brand | Diederichs 6840007 / BLIC 6504-04-3161311P | Catalogue references can group different market configurations; do not order from number alone. |
| Superseded part number | No confirmed supersession verified | Ask us to compare your VIN and photographs before purchase. |
Item Details & Specifics
| Part | Front left outer wing / fender |
|---|---|
| Vehicle application | Hyundai Lantra I / Elantra I J1 facelift, 1994-1995, four-door saloon |
| Placement | Front left — UK passenger side / nearside front (NSF) |
| Material | Pressed steel body panel |
| Finish / colour | Blue painted finish; exact paint code is not confirmed and a bodyshop colour match/respray may be required |
| Side repeater | Amber repeater lens, bulb holder and short wiring section are shown; bulb operation is not guaranteed unless specifically tested |
| Body moulding | Two moulding clip apertures are present; external side moulding is not shown as included |
| Condition | Pre-owned vehicle-removed panel with age-related scratches, chips, marks, dirt/staining to the inner face and local surface corrosion around some mounting areas visible in the photographs |
| Included | The photographed wing and components visibly attached to it |
| Not included | Mounting bolts, arch liner, bumper, headlamp, side moulding and any component not clearly shown |
| Preparation | Professional inspection, cleaning, local rust treatment, panel preparation, trial fit, alignment and refinishing may be required before final installation |
| eBay item number | 147479020753 |
Where It Fits & What It Does
Location
The panel bolts to the left side of the front body structure. It sits between the bonnet/headlamp area, front door/A-pillar edge, bumper corner, sill and front wheel opening.
Function
It forms the outer wheel-arch and body contour, supports the side-repeater position on this specification, helps shield the wheelhouse from road debris and provides correct gaps to the bonnet, door, bumper and lamp area. It is normally an outer bolt-on panel rather than the vehicle's main structural crash member.
Common Signs Your Wing May Need Replacement
- Severe dents, creases or stretched metal that cannot be economically reshaped.
- Rust perforation, bubbling paint or weakened mounting lips around the wheel arch, sill or bonnet edge.
- Cracked or torn mounting points causing poor bonnet, door, bumper or headlamp gaps.
- A loose or damaged side-repeater mounting area.
- Sharp exposed edges after impact damage.
- Tyre contact, rubbing arch liner or water/debris ingress caused by a badly distorted panel.
Why Choose a Vehicle-Removed Factory-Formed Panel?
Original production contours can help achieve consistent bonnet, door and bumper gaps when the shell is undamaged.
A pre-owned panel can cost substantially less than a new replacement, depending on availability, condition and current new-part pricing.
Reusing a serviceable steel panel keeps an existing part in circulation and can reduce demand for new manufacturing.
Fitting Guide
- Confirm the panel first. Trial-compare the side-repeater aperture, moulding holes, wheel-arch profile and all mounting flanges before dismantling the vehicle.
- Prepare safely. Park on level ground, apply the parking brake and disconnect the battery negative terminal before separating repeater wiring. Raise and support the vehicle correctly if wheel removal is needed.
- Remove access components. Depending on access, remove the left front wheel, arch liner/fasteners, side repeater, bumper corner fixings and any lamp or trim component overlapping the wing edge.
- Release the old wing. Locate and remove the upper bonnet-edge bolts, rear door-jamb/A-pillar fasteners, lower sill mounting and front-edge fixings. Use penetrating fluid and support the panel while the final fasteners are removed.
- Inspect hidden areas. Check the inner wing, mounting rails, sill edge, bumper support and wiring for corrosion or accident distortion. Rectify structural or corrosion issues before fitting the replacement panel.
- Prepare the replacement. Clean the inner face, treat surface corrosion, protect bare metal, transfer required clips/components and carry out bodyshop preparation before final paint.
- Trial fit and align. Install all fasteners loosely. Set even gaps to the bonnet, door, headlamp and bumper. Confirm the door opens without contact and the tyre/liner has full clearance on steering lock.
- Finish and verify. Tighten fasteners appropriately, reconnect the repeater, refit liner/trim/bumper parts and test the lamp. Apply suitable corrosion protection to hidden seams and recheck panel gaps after a short road test.
Recommended Tools & Consumables
Mechanical Tools
- Metric socket and spanner set, typically covering 8-12 mm fasteners
- Ratchet, extensions and universal joint
- Screwdriver set and trim-clip removal tools
- Torque wrench suitable for small body fasteners
- Jack, wheel chocks and axle stands if wheel removal is required
- Protective gloves, eye protection and panel blankets
Bodyshop Consumables
- Penetrating fluid and replacement clips/fasteners as required
- Degreaser, abrasive materials and rust converter where appropriate
- Etch/epoxy primer, seam protection and cavity wax
- Panel-gap spacers or masking tape for alignment
- Colour-matched paint and clearcoat applied by a competent bodyshop
Estimated Repair Time & Static Labour Calculator
Practical fitting estimate: approximately 2.0-3.5 labour hours for an experienced technician to remove, trial fit and align the wing on a straightforward vehicle. DIY work may take 3-6 hours. Corroded fasteners, previous accident damage, bumper/lamp removal and panel preparation can increase the time. Painting, curing and refinishing are additional.
| Garage Rate | 2.0 Hours | 2.5 Hours | 3.0 Hours | 3.5 Hours |
|---|---|---|---|---|
| £50/hour | £100 | £125 | £150 | £175 |
| £75/hour | £150 | £187.50 | £225 | £262.50 |
| £100/hour | £200 | £250 | £300 | £350 |
| £125/hour | £250 | £312.50 | £375 | £437.50 |
Calculation: hourly labour rate × billed hours. Figures are examples only and exclude the part, paint, materials, diagnosis, corrosion repair, taxes and any additional components. Ask your chosen repairer for a written quotation.
Fitting Service — Subject to Availability

Need help with installation?
Fitting may be available subject to workshop capacity, vehicle condition and prior assessment. Labour, paintwork, additional fixings and related repairs are quoted separately.
Please contact us through eBay Messages before travelling or purchasing fitting services. No fitting slot is reserved until availability and scope have been confirmed.
Correct-Part Checklist — Reduce Wrong Orders
| 1. Model generation | Confirm J1 facelift, not J2 or later. |
|---|---|
| 2. Production year | Confirm 1994-1995 application and check the VIN/production date. |
| 3. Body style | Confirm four-door saloon. |
| 4. Side | Confirm front left: UK passenger side / nearside front. |
| 5. Repeater aperture | Confirm the oval side-repeater position matches exactly. |
| 6. Moulding apertures | Confirm the two square clip holes and their spacing. |
| 7. Mounting edges | Compare bonnet edge, door-jamb edge, sill mount, bumper edge and wheel arch. |
| 8. Paint expectations | Assume preparation and refinishing may be required; colour match is never guaranteed from screen photographs. |
Delivery, Address & International Orders
- Postage is not advertised as free. The available service and cost are shown by eBay at checkout.
- Check your checkout address before payment. Orders must be sent to the address supplied by eBay; we cannot manually redirect an order after purchase.
- International delivery is available only where eBay displays an eligible Global Shipping Programme or equivalent international service and a price at checkout.
- Destination availability, import charges, duties, taxes, carrier limits and oversize-body-panel restrictions are determined by eBay and the appointed carrier.
- Inspect the parcel promptly and retain all packaging if transit damage is suspected.
Returns & Fitment Responsibility
VAT Information
Large Stock, Careful Dispatch


ThePartPilot holds more than 25,000 parts in stock at any one time. Each order is selected against the listing reference and prepared for dispatch with the part's size, weight and vulnerable edges in mind.
Support a Local Small Business & Reuse Parts
♻️ 💚 📦 Buying a serviceable pre-owned vehicle part supports a local independent business, extends the useful life of an existing component and helps reduce avoidable waste. Thank you for choosing reuse, careful fitment checking and responsible repair.
WhatsApp QR for Fitment Help / Appointment Enquiries
Scan the QR code to contact ThePartPilot on WhatsApp for fitment checks, appointments or fitting service availability.For faster fitment help, send your vehicle registration, VIN if available, and clear photos of your existing part, connector and part number.